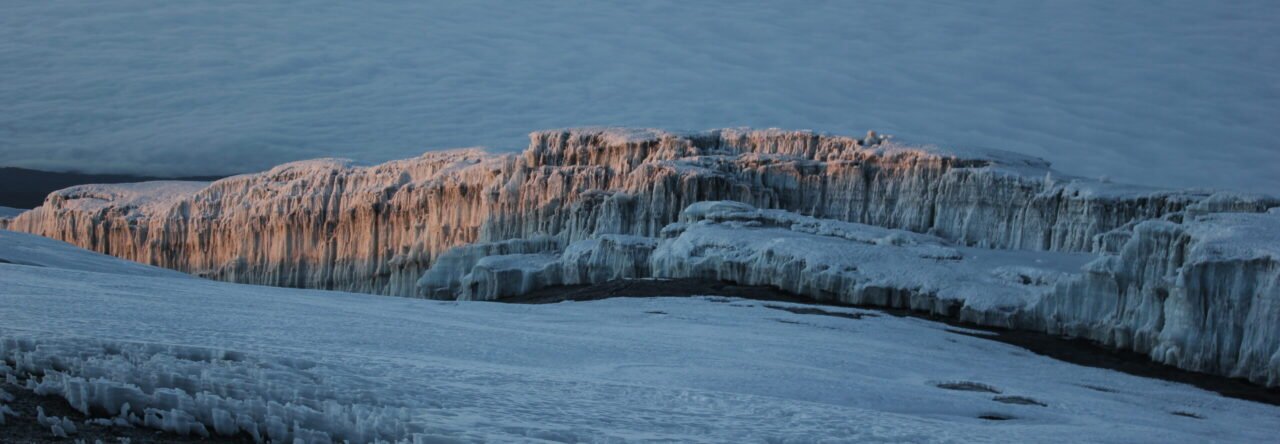
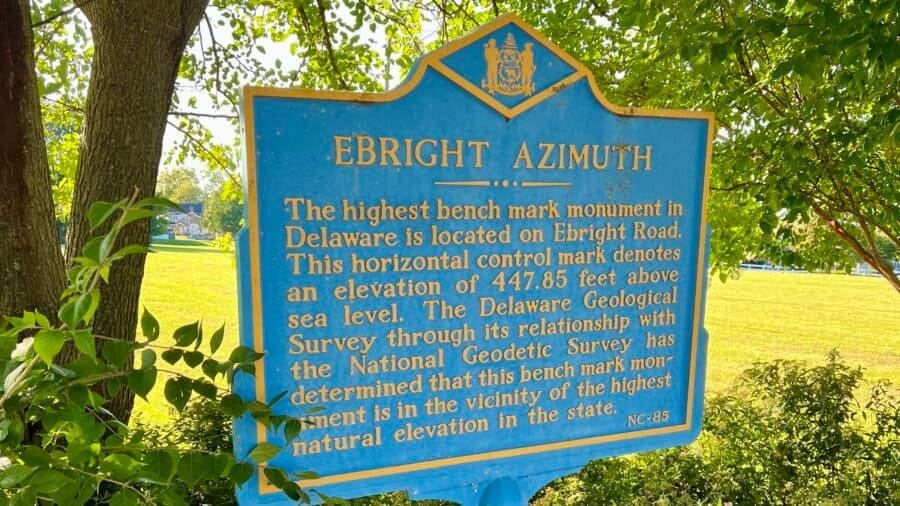
Ebright Azimuth sits in northern Delaware, just north of Wilmington and only steps from the Pennsylvania–Delaware border. At 448 feet above sea level, it ranks #49 among U.S. state high points and became my 21st state high point — a very different experience than my previous summit, Mount Mitchell.
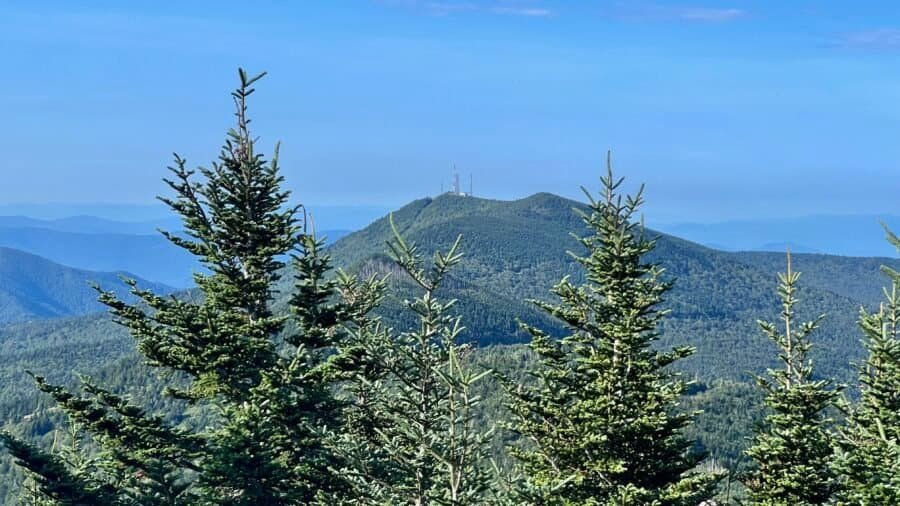
At 6,684 feet, Mount Mitchell stands as the highest point east of the Mississippi River — and, as a result, became my 20th state high point. Since it’s just outside Asheville, I stayed there the night before and set my alarm early, hoping to beat both the crowds and the afternoon haze that often rolls through these mountains.
Sassafras Mountain rises to 3,553 feet, making it the highest natural point in South Carolina and ranking #29 among U.S. state high points. Sitting right on the border with North Carolina, Sassafras is one of those summits you can drive to—but after days of moving through the Carolinas, I wanted this one to feel earned.
This stop marked my 19th state high point, and while Sassafras Mountain is approachable by design, it still offered a choice: convenience or effort. I chose the longer way up.
At 6,643 feet above sea level, Clingmans Dome—now officially known as Kuwohi—is the highest point in Tennessee, ranking #17 among U.S. state high points and rising along the border of Tennessee and North Carolina within Great Smoky Mountains National Park. This was my 18th state high point, and while reaching the summit itself turned out to be fairly straightforward, everything leading up to it was a reminder of why preparation—and a little patience—matters more than you think.
I tend to travel with the wind. Most of the time that works in my favor. Occasionally, it nearly costs me a summit. Clingmans Dome was almost one of those occasions.
As I have been exploring the various State Parks on the list of the Best State Parks in Each State (from The Discoverer Blog), and as I have been climbing to the top of the Highest Point in Each State, I have gained some valuable insights. One of the most important is to always check the park’s website before planning a visit, as I discovered when I was thinking about a visit to Fall Creek Falls. Due to a severe storm that caused power outages and fallen trees, Fall Creek Falls was temporarily closed. I later discovered that this park rarely closes, which highlights the importance of keeping up-to-date with park information.
About the Park
Fall Creek Falls State Park is a paradise of more than 29,800 acres, sprawled across the western top of the rugged Cumberland Plateau, one of the most scenic and spectacular outdoor recreation areas in America. Laced with cascades, gorges, waterfalls, streams and lush stands of virgin hardwood timber, the park attracts those who enjoy nature at her finest. The striking Fall Creek Falls plunges 256 feet into a shaded pool. It is one of the highest waterfalls in the eastern United States; other notable waterfalls in the park are Piney and Cane Creek Falls and Cane Creek Cascades. The park offers over 56 miles of hiking trails, three mountain bike trails covering 24 miles, fishing in Fall Creek Lake (345 acre) home to state record catches for Channel Catfish and Bluegill, one of the most challenging 18-hole golf courses, a canopy challenge course and rock climbing. The park is about 2¼ hours from Nashville and 1¼ hours from Chattanooga. I am also happy to report there is no entrance fee, making it accessible to those less fortunate.
How did I not know about this park!?
In all the years I lived in Middle Tennessee, I am surprised I didn’t hear about or know about Fall Creek Falls State Park. I had the same epiphinay when I went to Hocking Hills State Park in Ohio. The moral of the story – take the time to explore and visit the sights and parks around you! I am sure you’d be surprised at what sits in your backyard – and no I am not talking about that old grill you were supposed to dispose of a decade ago.
Pictures: Park Brochure
Picture: Park Entrance
A long road in…
I came into the park from the west on TN-284 and I was surprised at how long of a drive it was into the park from the highway. The first stop, which should be no surprise to most of you – The Visitor Center. I always recommend stopping at the visitor center to ask some important questions – Are there are any trails closed? What animals may I encounter? What trails are must-do’s? And knowing that the park had experienced damage, it was particularly pertinent to stop there on this trip. Good thing I did as I learned that the Scenic Loop Road and Piney Falls Trails were still closed. From there I was off to the Nature Center, where I would park.
Pictures: Trail Maps
Leave your keg at the entrance….
On the way to the Nature Center, I stopped by Gorge Hole, but I was a little bummed that alcohol was prohibited. Good thing that I left my keg in the car – jk! But I was surprised at the No Swimming sign as I didn’t feel the water was that high, sketchy – yes, but high – no. It’s a beautiful area and will give you a good feel for what you are about to see and experience throughout the park.
Pictures: Gorge Hole
Pictures: Gorge Hole area
Picture: Sketchy water, imo!
Let’s see some Waterfalls!
I parked at the Betty Dunn Nature Center and headed for one of the two suspension bridges in the park. From the bridge, you’ll get an overhead view of Cane Creek and the Cane Creek Cascades. I went across the bridge and then back towards the Nature Center as I wanted to explore the Cascades first and the area above 85-foot Cane Creek Falls. There’s also an overlook area giving you a side view of Cane Creek Falls.
Pictures: The Suspension Bridge – first from the Nature Center Side, then the other side of the bridge.
Pictures: Looking down on the Cane Creek Cascades | Cane Creek
Pictures: The Suspension Bridge | Cane Creek Cascades
Pictures: Cane Creek Cascades | The area just before the 85-foot drop and Cane Creek Falls
Pictures: Cane Creek Falls | Basin area of Cane Creek Falls
Nothing like starting the day out on a difficult trail…
I had read about the Cable Trail – a short (0.1-mile), yet difficult trail down to the basin of the falls. So off I went on the Paw Paw trail, and then to the infamous Cable Trail. The Paw Paw trail – at least the portion I went on – is a beautiful trail meandering through the woods. Eventually, you will reach a bridge, which you cross, then you go up the side of the hill, make a left, and you’re at the Cable Trail. Let’s start by saying – the trail begins with a warning sign – then plunges down. I got about halfway down, but as I was the only one on the trail and because I hit a rather slick area with little to no place to step firmly, I decided to go back up and not risk it at this point. I probably would have continued if I had been with someone with a little more experience. Or if I were 4 years old, as posted on AllTrails – “The cable trail was fairly difficult, but my four-year-old worked it like it was nothing.” Really?!
Pictures: Bridge crossing creek | Cable Trail Warning Sign
Pictures: The Cable Trail – it’s more daunting than it looks in the pictures
An adventure awaits!
I went back to the Nature Center and took the Woodland Trail that leads to the suspension bridge. After crossing the bridge, there is a steep flight of stairs that leads up to the other side of the ravine. In less than a quarter-mile, you’ll find the Gorge Overlook Trail to your right which is 0.65 miles one-way. The first spur you’ll come will take you to the Cane Creek Falls overlook – which I highly recommend. From here you’ll get a view of both 125-foot-high Rockhouse Falls and 85-foot-high Cane Creek Falls.
Picture: Rockhouse Falls (left side) and Cane Creek Falls (right side)
Picture: Rockhouse Falls
The next spur is the Cane Creek Gulf Overlook, which was just ok as there wasn’t much of a view because of the trees. As I hiked this trail, I definitely saw the aftermath of the powerful storm that passed through. I will have to say, the crew that cleaned up the trails did an amazing job and they did it quickly. (I made sure to stop by the visitor’s center and let them know how impressed I was!) The spur to Rocky Point Overlook is next on the trail which offers some great views.
Pictures: Aftermath of the storm | Clear trails due to the incredible work by the park staff
Pictures: Some of the cool mushrooms I saw while hiking
Pictures: Views from Rocky Point Overlook
Did I really see Adele on the trail?
Eventually, the Gorge Overlook Trail connects back with the Woodland Trail, and from there, it’s about a ¼-mile to the Fall Creek Falls Overlook. From here you will get the money shot of 256-foot high Fall Creek Falls, and if you are lucky you’ll also see Raccoon (Coon) Creek Falls, with the latter being a seasonal waterfall.
Picture: Fall Creek Falls (center) and Raccoon Creek Falls – a trickle (right)
So, I am sure you are glued to your seat and want to hear about Adele?! When I hike, I dictate my notes into my phone so that I can capture my experiences at that moment. However, Siri doesn’t understand me and often my notes don’t make alot of sense. So here is what Siri heard on this hike – “The Fall Creek Falls overlook it’s not worth it in my opinion, although I did see Adele along the way.” So I must have seen Adele! lol And I am not sure why I said the overlook wasn’t worth it?
The best hike of the day….
From the Fall Creek Falls overlook, you can take the Base of the Falls Trail. It’s only 0.35 miles down, but it’s a steep hike down to the base of the falls – but SOOOO worth it! And if you do decide to hike it, bring water shoes as you’ll want to take a dip in the water, especially on a hot summer day. I still took a dip, but it was a bit challenging in my bare feet with all the rocks and stones. The water was so refreshing and it was cool to feel the force of the water dropping from above. Trivia: Fall Creek Falls is the highest “free-falling” waterfall east of the Rocky Mountains.
Pictures: From my hike down to the base of the falls
Pictures: More pictures from the hike down to the base of the falls
Picture: Fall Creek Falls from the base
Pictures: Fall Creek Falls – you can see someone swimming in the pool | Falls Selfie
Pictures: The hike back up to the Overlook area
There is always time for another hike!
After getting back to the top, I headed back to the Nature Center on the Woodland Trail – 0.75 miles one-way. I decided I had more to explore and headed back out on the Paw Paw Trail, this time passing the Cable Trail. I later realized that this trail was probably meant to be closed as it was a bit challenging to navigate due to the trees that were down. It was also a bit swampy and buggy in the early part of the trail. This trail is a loop and I decided to take the portion that traversed the edge of the gorge. Ironically, you come to another Cane Creek Gulf Overlook. This Overlook was definitely worth it, but you have to be cautious as there are no fences at the overlook and it’s a large drop down!
Pictures: Directional Sign | View from the Cane Creek Gulf Overlook
Pictures: Overcoming my fear of heights!
Pictures: Signs stating the obvious, imo
I went a little further on this trail, to another overlook, which wasn’t great due to the trees blocking any sort of a view. At this point, I turned around and headed back to the Nature Center.
That hike deserves a beer!
I finished the day by driving around and checking out the pool, lodge, cabins, and other amenities the park has to offer. Near the pool is a Snack Bar, so I decided to stop in, grab a beer and a bite to eat. Unfortunately being a pescatarian, the only thing I could eat was the Fried Mozzarella Cheese sticks. All in all, a really nice park despite the damage it suffered during the recent storm. I would definitely put this on my list of things to do if I lived or were visiting Middle Tennessee!
Brasstown Bald—Georgia’s highest point—was my 17th state high point, rising to 4,784 feet above sea level and ranking #25 among U.S. State High Points. After a full morning of hiking at Cloudland Canyon State Park, I decided to see if I could still make it to Brasstown Bald and reach the summit before dark.
Some might call that crazy. I call it seizing the moment.
Cloudland Canyon State Park was a short 40-minute drive from my last park – DeSoto State Park in Alabama. On my way up to the park – driving along the top of Lookout Mountain and looking at real estate signs – I was reintroduced to a mountain term – The Brow. The brow is the ridge that tops the mountain, I.e. being on the brow is worth about $1MM or said another way houses on the brow were significantly more expensive than those across the street. All joking aside, the views from the Brow were breathtaking – should I say million-dollar views. lol
Pictures: Park Entrance | Map and Overview of Park
About the Park…
Cloudland Canyon State Park is one of my favorite parks. It’s located on the western edge of Lookout Mountain and is one of the largest and most scenic parks in the state. The park features thousand-foot deep canyons, sandstone cliffs, wild caves, waterfalls, cascading creeks, dense woodland and abundant wildlife. With 64 miles of hiking trails, 30 miles of biking trails in the newly developed Five Points Recreation Area and along the Cloudland Connector Trail, and 16 miles of horseback riding trails, there’s plenty to explore. The park also offers disc golf, a fishing pond, picnicking areas, and overlooks. If you’re looking to spend the night, there are fully-equipped and comfortable cottages, quirky yurts, and several different types of camping and backpacking options available. The entrance fee is $5 per vehicle, making it a reasonable option for a day trip.
Be ahead of the curve and seize the day!
Being a mere 30-minutes from Chattanooga and NE Georgia, Cloudland Canyon State Park is a very popular park and can get crowded. I am SO happy that I got there early and avoided the crowds, wannabe Instagram influencers, and city folk (well almost). And yes, I actually like a park that has city folk! Anyway, off I went for a series of hikes totaling about 8-miles for the day. Note: I was able to park in one place – near the Main Overlook – and hike all three of the trails I went on. From this parking lot, you get some great views of the canyon as well.
Pictures: Trail Map and Legend
Picture: Morning view of the Canyon
Let’s start the day with some elevation change and the Waterfalls Trail…
I’d be happy to rewrite the text to make it clearer. Here’s the corrected version:
According to the park brochure, the Waterfalls Trail is 1.8 miles roundtrip from the Main Trailhead. However, I measured it to be 2 miles, which includes the distance from the parking lot and a little detour that I took (which I will explain later in this post). The park labels this hike as strenuous due to the 600 steps one way, but I found it to be a good cardio workout. If you’re hiking with your dog, note that the stairs are made of metal grating, which could be challenging for some dogs. Since it was a short out-and-back hike, I didn’t bring a backpack or daypack, and I wore shorts, a t-shirt, and sneakers (which were key considering the number of stairs). Note that the trails are very well marked, as you can see in my pictures.
Pictures: Directional Sign from the Parking Lot area | About the Falls
Pictures: Main Trailhead | Some of the steps are dirt and gravel | Others metal grates and wood
As noted in the picture above about the waterfalls, the quantity of water over the falls varies greatly from month to month, but in general, winter and early spring offer the greatest flow. It was August, but I am happy to say it wasn’t a trickle – but certainly no torrent.
After parking your car, it’s just a short hike to the Main Trailhead. You will see a marker for several trails there. The trail is mostly downhill, with a few flat areas as you go through the canyon. After about half a mile, you will come across a sign pointing towards Cherokee Falls. The hike to the falls is relatively easy and not too long. Cherokee Falls is the first waterfall on Daniel Creek and drops 65 feet into a large pool.
Pictures: On the hike down to Cherokee Falls
Pictures: Daniel Creek
Picture: Cherokee Falls
Pictures: A rare picture of myself (that isn’t a selfie) | The rock walls from around the falls
Once you reach this point, you should head back to where the trail separated and then make your way down to Hemlock Falls. Along this trail, you will come across various spots where you can take a break, catch your breath and relax for a while. Although it may not be as necessary on the way down, these resting spots can be quite helpful when making your way back up.
Pictures: Where the trail splits for the two different waterfalls | One of the areas to sit and rest
Pictures: Canyon Walls on the way down to Hemlock Falls
Hemlock Falls is about another ½-mile down where you’ll see another split in the trail – to the left Hemlock Falls and to the right Sitton’s Gulch Trail. I would recommend you go a short distance – about 150-feet – on Sitton’s Gulch Trail to the bridge that crosses Daniel Creek. You’ll get a great view of the creek and also a good appreciation on how far down in the canyon you have gone. Back to Hemlock Falls and the end of the trail I went. Hemlock Falls is the second falls from the top of Daniel Creek and drops 100-feet. As this was the end of the trail, it was back up to the top – 600 stairs to go!
Pictures: Trail Split for Hemlock Falls and Sitton’s Gulch Trail | Bridge over Daniel Creek | Daniel Creek
Picture: Hemlock Falls
Pictures: The Stairs – looking up – where I am headed back to the top
Time for a wardrobe change!
I planned to hike the West Rim Loop next, which is a 5-mile loop. Considering the distance and time of year, I decided to change into boots and carry a day pack containing some snacks and water. I preferred boots as I wasn’t using poles while hiking and being summer, I was concerned about Timber Rattlesnakes.
The West Rim Loop Trail is a popular five-mile hike that was once rated as one of the top ten hikes in the U.S. by Backpacker Magazine. The trail has a lollipop shape and offers several overlooks that showcase the park’s rugged geology, deep canyons, dense woodland, and stunning views beyond. To begin the hike, hikers start from the Main Trailhead and cross over Daniel Creek. The trail then heads uphill towards a rocky promontory.
Pictures: Bridge of Daniel Creek | Daniel Creek
Pictures: West Rim Trail | Cave along the trail
Shortly into the hike, you’ll pass Yurt Village. I personally have a fascination with Yurts and actually stayed at one in Marfa, Texas at El Cosmico. Along the trail, I also saw a cool mushroom – yes I am addicted to mushrooms! Soon you’ll reach the brim – and as you will see in my pictures, although there are railings and safe guards in many areas, in other areas there are none and it is a LONG way down!
Pictures: Yurt Village from the West Loop Trail | Directional Sign | Yurt Village
Pictures: The Cool Mushroom | View of the Canyon | A long way down!
After hiking for a mile, the loop component of the trail starts, which is three miles long. During this section, you’ll come across many overlooks. On one of these overlooks, I met a man named Lance from Cleveland, TN, near Chattanooga. We ended up hiking together for the last two miles of the trail. Although I enjoy hiking alone, it was nice to have company.
Pictures: Loop begins here | Yellow blazes mark the West Rim Trail
As mentioned earlier, the trails are well-marked and include directions to scenic overlooks. From the first overlook, you can see the main overlook where I parked.
Pictures: Directional to Scenic Overlook | Looking towards the main overlook | Scenic overlook view
There are 4 overlooks on this part of the trail, and they are all on the first half of the hike. You’ll also come across some cool boulders that you have to jump over to get to the view (that is if you feel comfortable doing so). After the fourth overlook, the trail moves in and away from the brim.
Picture: View from the second overlook
Pictures: View from the third overlook | No railing here – it’s a long way down!
Picture: View from the fourth overlook
Pictures: Where I did some boulder jumping
At about mile four, you complete the loop and then head back to the Main Trailhead, retracing your steps of the first mile. The trail got a bit busier at this point – and city folk definitely were out. Case in point, there was this young girl and guy who came barreling down the trail and didn’t even move to the side, despite uphill hikers having the right of way. I wish people would learn hiking/trail etiquette. Anyway, Lance and I parted ways at the parking lot, and I was off for my third hike of the day. But first….
Wardrobe change #3!
I decided to finish the day by hiking the Overlook Trail – and I am so happy I did! It’s an easy trail – one-mile roundtrip – and I actually changed into my flip-flops as my feet needed a break after the two-morning hikes. The trail offers picturesque views into the canyon. It leads along the rim of the canyon and behind the Interpretive Center to the Main Overlook, then continues onto a second overlook. This trail is mostly flat, and benches along the way offer opportunities for relaxation and contemplation. The Overlook Trail is marked by light blue blazes on trees. (not that you really need them). All in all, I great day of hiking with amazing views. I’d highly recommend visiting Cloudland Canyon State Park if you are in the area, and I would even suggest making a special trip here.
Pictures: Relaxing in flip-flops before I tackle the Overlook Trail | View from the Overlook Trail
Pictures: Incredible views from the Main Overlook
Pictures: Final view of the Canyon | Obligatory selfie
So after a bit of a delay and some crazy weather in Oxford, Alabama (a story for another time) – I was back on track to explore new parks and climb more mountains!
Picture: Crazy Weather in Oxford, AL
DeSoto State Park is off of I-59 between Birmingham, AL, and Chattanooga, TN, and is very close to the Georgia border. It is located in Ft. Payne, AL – which ironically made me think of the Damon Wayans movie – Major Payne. “What are you laughing at, pig-boy? You find a piece of candy in your pocket?” I digress again…
About the Park and some fun facts!
Desoto State Park is nestled atop beautiful Lookout Mountain in scenic Northeast Alabama and is the home of many rushing waterfalls and fragrant wildflowers that will simply take your breath away. (the park’s website words, not mine). The park is split into two parts – DeSoto State Park and DeSoto Falls – both linked by the West Fork of the Little River – but DeSoto Falls is 6 miles north of the main park. DeSoto State Park has plenty to do: kayaking, fishing, swimming, 25 miles of hiking trails, 11 miles of mountain bike trails, rappelling, bouldering, picnicking, and camping.
The park, which bears the name of 16th-century explorer Hernando de Soto, was developed in the 1930s by the Civilian Conservation Corps (CCC) and known as State Park No. 5. When it was dedicated as Desoto State Park on May 24, 1939, it was the largest state park in Alabama. The park’s museum celebrating the CCC’s work in Alabama state parks opened in 2013. Fun Fact: Hernando de Soto was the first European documented as having crossed the Mississippi River. More Jeopardy! trivia for you!
Pictures: Main Park Trail Map | DeSoto Falls Trail Map
DeSoto Waterfall – 3 different views!
I should note first about this post – I try to take copious notes when hiking and visiting parks as I know that I may not post about it for several days or in this case several months. However, the notes for this visit somehow disappeared into the digital universe. So it is forcing me to jog my memory a bit and actually exercise my brain! Not the worst thing to happen, but I may not get every detail correct.
I decided to check out DeSoto Falls first as it was a beautiful day. To get there from DeSoto State Park from the Country Store in the main park, head north to Alabama-89 and turn left. The road will veer right at Wade Gap (but it’s still Alabama-89). Continue until you reach Tutwiler Gap and Alabama-163, turn right here. You know you are in the right place if you see a colorful directional sign on a tree. Alabama-163 will eventually turn into DeSoto Falls Road and dead end into the Picnic Area parking lot (which has a fee of $4 per vehicle – but see my note later in this post). As you are driving toward the Picnic Area, you will see a small gravel parking lot on the right hand side – this is the parking lot for the River and Overlook Trailheads. I started my visit.
Picture: Directional Sign at Titwiler Gap
From this spot – you can reach two of the views of DeSoto Falls. I decided to go to the Basin first and thus took the River Trail. The trailhead is to the right and closer to the road. River Trail is 0.7-miles one-way (Note: I did a combination of trails though – but it still was a total of 0.7-miles one-way). The initial part of the River Trail is down hill slightly and a bit rocky, yet easy to navigate. On this trail you’ll pass several large boulders which are so common to the area. Shortly into the hike, I saw the turnoff for Bluff Trail (0.32-miles in distance) and decided to take it. At this point, I think I was winging it a bit, but I wasn’t too worried as the area isn’t so big that you could get lost. Bluff Trail was a bit steep and continued to be rocky, but nothing too challenging. You’ll pass a cave, and more boulders. Eventually it connects back with the River Trail – where it’s a flat hike out to the Basin.
Pictures: The upper River Trail
Pictures: The Bluff Trail turnoff | The Bluff Trail
Pictures: Along the lower River Trail
When you get to the Basin, you’ll see why you hiked down as you’re rewarded with a massive pool and a spectacular view of the 104-foot waterfall. It was hot enough that if I had the right clothes, I would have taken a dip. Side note: Much of the park information is inconsistent – I have seen park info noting that the falls are anywhere from 5.5 miles to 7 miles north of the park and that the falls are 104 feet and then 107 feet high. Personally, I think they need to hire a proofreader!
Picture: DeSoto Falls Basin
Pictures: DeSoto Fals
After taking in the view, I headed back up the hill to the Overlook Trail and view #2. As you hike up, you’ll pass a bench in case you need to rest a bit – I pushed on. It took me about 40 minutes out and back to do the 1.4 miles – using both The River and Bluff Trails. You connect to the Overlook Trail near the trailhead.
Pictures: Bench | Along the Bluff Trail
The Overlook Trail is pretty flat and an easy 0.9 miles out and back. The beginning of the trail parallels the River and Bluff Trails – giving you a view of the trails below. The Bluff Trail also has a bench rest and take in the scenery. Eventually, you are rewarded with view #2 of DeSoto Falls – although you are a bit further away from the falls than from the basin. Also, as it was the middle of summer, the trees were full and blocked some of the views. Personally, I preferred the view from the Basin – not only were you closer, but it gave you a better appreciation of how high the falls are.
Pictures: Looking down on the trails below from the Overlook Trail
Pictures: The Bluff Trail
Pictures: DeSoto Falls from the Overlook
With two views of the falls down, I decided to head back to the main park and check into my campsite. I chose the Wall Tent Campsite – it’s still rustic and in the Primitive Campground, but it saved me the time of setting up and breaking down my own tent. It was also on a raised platform, keeping me dry – although it hadn’t rained, nor was rain in the forecast. I got settled into camp and then decided to hike a bit more as I still had a few more hours of sunlight.
Pictures: The Primitive Campground Entrance | The Wall Tent Site – courtesy of the Boy Scouts
Falls without Falls
For the afternoon hike, I decided to go on the Orange, Blue, and Red Trails for a total distance of about 4 miles on just the trails. My campsite was just a short distance to the road, so I decided to hike to the Lost Falls (Orange) trailhead instead of driving. I walked out to the main road, then down the road for about a half-mile to the trailhead – adding another 1-mile to my afternoon hike. There is a restroom at this trailhead, which is always a good stop before you start a hike. After my brief pit stop, I was off on the Orange Trail – which for the most part well marked but not too exciting – but I did see an interesting looking mushroom. I soon connected with the Blue Trail as I wanted to see some of the other waterfalls. As a note: for the most part the Orange and Blue Trails run parallel to each other – they are just separated by Laurel Creek.
Pictures: The Orange Trail | Cool looking Mushroom
Pictures: Hiking along the Blue Trail
The first falls to find – Lost Falls. Well, it was certainly lost or maybe it was me, because I passed it and had to double back to check it out – but in my defense, none of the falls are marked well! Sad to say, the creek was pretty dry and Lost Falls was a trickle. The highlight – seeing another cool mushroom!
Pictures: Along the Blue Trail with a cool greenish mushroom
I pressed on towards Laurel Falls. Another note: The trail was a bit overgrown here and I kept wondering if anything was hiding in the grass and going to bite me as I wasn’t hiking with poles. Happy to say, I finished unscathed – no snake bites.
Once I connected to the road, I hiked uphill a little and then connected to the Red Trail. The Red Trail is an interesting trail – it not only is one of North Alabama’s Birding Trails and home to many of North Alabama bird species, such as Belted Kingfishers, as well as migratory birds that winter in Central and South America, Warblers, and Thrushes – but it is also a raised, boardwalk trail, allowing access to those who are physically challenged. I was happy to see it as I am very supportive of making outdoor experiences all-inclusive.
Pictures: Birding Trail | Birds of North Alabama
Pictures: The Boardwalk Trail
Pictures: Along the Boardwalk Trail
I soon connected back to the Orange Trail and made my way back to the trailhead, then to camp. As I was getting settled into my camp for the night, a ranger stopped by to check in and make sure I had a reservation and that I didn’t need anything. I really think he was seeing if I had any contraband – i.e. alcohol. After a short conversation, off he went. I made a fire, watched the fireflies, and enjoyed the peace and quiet.
Day 2 at DeSoto
Although I probably could have seen everything in one day, I was happy to stay in the park. I was up early the next morning – had a quick breakfast and then headed out for my planned hikes. First up – Indian Falls, which is near the Boardwalk Trailhead from yesterday. It’s a quick hike from the parking lot to the falls, but to no surprise, it was dry – so a bit disappointing. So a quick visit and off to the next hike.
Pictures: Indian Falls Area
Pictures: Indian Falls
I drove down to the Lodge, where I parked, and hiked a portion of the Yellow and the Green Trails to see Lodge Falls and the West Fork of the Little River. The Little River was nice, but the falls were a disappointment due to the lack of water.
Pictures: West Fork of the Little River
DeSoto Falls – View #3
I got back in the car and went back north to DeSoto Falls and this time the Picnic Area. And as I mentioned earlier, there is a $4 per vehicle fee, but as I camped in the park, I received a parking pass for here. In all honesty, I wouldn’t pay to park here if it were not included with my camping. I think the other views of the falls are much better. You can walk out to the area above the falls – and then out to an area that will give you a side view of the falls. As I was walking out to the observation area for view #3, I met a really nice couple. They are wild mushroom foragers and actually found wild chanterelles and made eggs with chanterelles for breakfast! I also played ranger and gave them the lay of the land on the falls and hikes they could take.
Pictures: The Upper Falls Area
Pictures: View #3 – from the side | A Look at the Basin from Above
Picture: View of the Upper Falls Area and of the DeSoto Falls
To the left of the dam and the falls is a boat launch. I saw several kayakers and paddle boarders on this portion of the river as you can go upstream a bit. There is also a sandy beach area to hang out and enjoy the sun.
Pictures: West Fork of the Little River | Sandy Beach Area
One of the more interesting parts of this area of the park are the steps down to the observation area. In 2018, DSP Naturalist Brittney Hughes conceived the idea of installing an ambitious public art project at DeSoto Falls—transforming the plain cement stairs leading to the viewing platform into a mosaic work of art. On each of the 43 ‘risers’ is a mosaic of colorful stained glass pieces – each riser is a separate piece of art but seen collectively they create a design that is pleasing to the eye. Brittney’s design features the West Fork of Little River flowing down the length of the steps, and a famous John Muir quote in the middle of the design: “Everybody needs beauty as well as bread, places to play in and pray in, where nature may heal and give strength to body and soul”~ John Muir.
Pictures: The Public Art Project and the Mosaic Risers
With DeSoto State Park checked off my list, I headed towards Georgia and Cloud Canyon State Park!