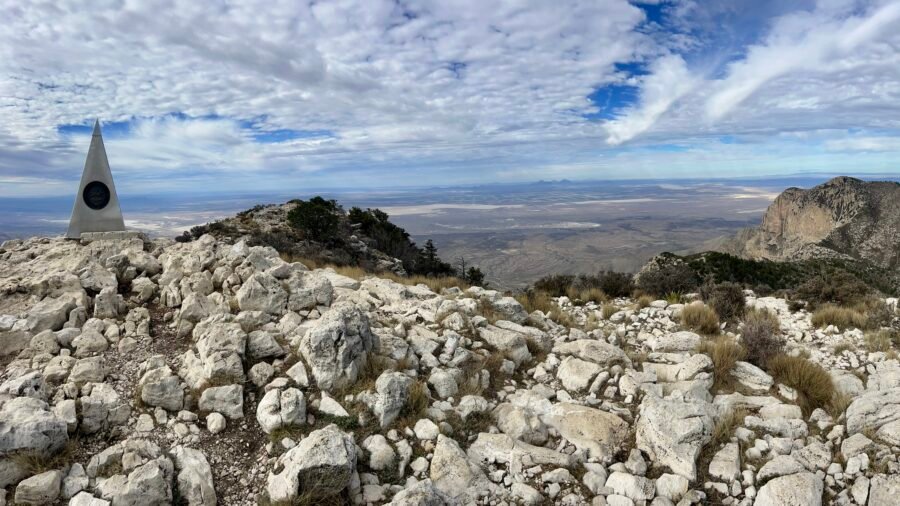
At 8,751 feet above sea level, Guadalupe Peak stands as the highest point in Texas, ranking #14 among U.S. state high points under 10,000 feet. It’s located inside Guadalupe Mountains National Park and marked my 27th state high point.
The day I hiked Guadalupe Peak was filled with emotion. I had read plenty of reviews on AllTrails — my go-to hiking resource — and a few of them planted some doubt. One comment stuck with me: “The last 100 yards are a bit scary as you can see a long way down and the rocks are slick.” Combine that with an 8.4-mile out-and-back trail and nearly 3,000 feet of elevation gain, and yes — I was nervous. I even had flashbacks to my climb up Mt. Katahdin on Abol Trail.
In the end? Was it hard? Heck yeah. Was it as hard as Katahdin? Not even close. Was I glad I did it? One word: Ecstatic.
The night before I visited Palo Duro Canyon State Park, I stayed in Amarillo, just a short 25-minute drive to the park entrance. When I arrived in Amarillo, the skies were blue, but that morning I woke to dense fog. With the hope of the fog burning off, I ventured out early, only to be greeted by a Texan wake-up call: a lingering essence of cow manure, an aromatic reminder of cattle country.
From Amarillo, I drove south on Interstate 27, then east on Texas 217, a two-lane road. One of the things I appreciate about driving in Texas is the speed limit – 75 mph on both roads! About a mile from the park entrance, you get a glimpse of what you are about to see, and at the time I was thinking how awesome it was going to be.
The Hype is Real!
Palo Duro Canyon State Park lives up to the Texas hype. Known as the “Grand Canyon of Texas,” Palo Duro Canyon, at 120 miles long, and 20 miles wide, is the second largest canyon in the country. The park spans over 28,000 acres and includes 60 miles of the canyon that reaches depths of 800 feet. Home to the iconic Lighthouse rock formation, the park offers 30 miles of hiking, biking, and equestrian trails, many of which traverse million-year-old rock formations. The park’s scenic drive covers 16 miles, providing panoramic views of the canyon’s majestic red cliffs and vibrant colors. Palo Duro Canyon offers a variety of camping options, from primitive sites to RV hook-ups, allowing visitors to immerse themselves in the tranquility of the surroundings. As the site of the renowned Texas Outdoor Musical at the Pioneer Amphitheatre, the park combines natural beauty with cultural entertainment. Access to the park costs $8 per person for a day pass, with complimentary admission for children aged 12 and under. Holders of the Texas State Park Pass also enjoy free entry.
The Civilian Conservation Corps (CCC) played a vital role in the development of Palo Duro Canyon State Park, Texas, during the 1930s. CCC workers constructed trails, bridges, and buildings, enhancing accessibility and preserving the park’s natural beauty. Traveling from one state park to another, many a testament to the CCC’s dedication and the hard work of its young men, I am struck by the invaluable contribution to conservation. The enduring legacy of the CCC is evident in the transformative impact on parks, promoting environmental stewardship and recreation. These parks stand as vital green spaces, nurturing physical and mental well-being for generations to come.
Picture: The Park Entrance – notice the overcast/foggy morning
Top 5 Activities at Palo Duro Canyon State Park
Hiking:
Palo Duro Canyon boasts numerous hiking trails, ranging from easy walks to challenging hikes. The Lighthouse Trail is particularly famous for its iconic rock formation, but there are many other trails with varying lengths and difficulty levels to explore. And as you hike, the park has several geocaching sites to discover and part of the Texas State Parks Geocache Challenge.
Scenic Drives:
The park features a scenic drive that offers breathtaking views of the canyon. The Palo Duro Canyon State Park Scenic Drive is a 16-mile route that allows visitors to appreciate the stunning landscapes and geological formations from the comfort of their vehicles.
Mountain Biking:
Mountain biking enthusiasts can enjoy the park’s designated biking trails. The terrain provides a mix of challenges suitable for different skill levels. Make sure to check for trail conditions and any specific regulations before heading out with your bike.
Camping:
Palo Duro Canyon State Park offers various camping options, including tent camping and RV camping. The park has both developed and primitive campsites, allowing visitors to immerse themselves in the natural surroundings. Reservations are recommended, especially during peak seasons.
Cultural Performances:
The Texas Outdoor Musical, hosted at the park’s Pioneer Amphitheatre, is a popular event that provides entertainment and a glimpse into the area’s history. The musical, known as “TEXAS,” celebrates the pioneer spirit and features live performances against the stunning backdrop of the canyon.
Longhorns, again?!
As you enter the park, you are greeted by several members of the official State Longhorn Herd. They represent the history of longhorns in the area, which roamed here for 200 years and were part of the Old JA Ranch, which was headquartered in the canyon and one of the greatest cattle operations in the world. I am happy to report, that unlike my longhorn encounter on Mount Rogers in Virginia, these longhorns were in a corral and a bit further away.
Pictures: Longhorns | About the Old JA Ranch
I headed over to the Canyon Gallery & Visitor Center, just a short drive into the park—something I always suggest checking out when exploring a new park. The road leading to the visitor center is one-way with an upper parking lot by the observation point and a smaller lot down the hill. Inside, the Gallery showcases historical videos, archaeological and nature exhibits, and features a beautifully arranged display of Southwest art for sale, including handmade Native American pottery, Navajo, Zuni, and Santo Domingo silver and turquoise jewelry, hunting knives, and a unique selection of hard-to-find regional tools like Comanche and Kiowa beaded items, along with t-shirts and hats. The gentleman at the gallery, who shared some info about the park, was really pushing to sell items. I ended up getting a few postcards, though not exactly what he was suggesting. I did discover that the park is an in-and-out park, meaning the road is a loop and there is only one way in and one way out.
Pictures: The Visitor Center & Canyon Gallery (left picture courtesy of Palo Duro Canyon Foundation)
As I continued to tour the park, I saw a lone fireplace, the remains of a recreation center built by the CCC. The CCC constructed their own barracks, a mess hall, a blacksmith shop, a tool shed, and a recreation center before they began work on the park. They spent their downtime at the recreation center, playing games and socializing. I will have to say, if it were not for the internet, I would not have known this as the informational sign for this point of interest was in disrepair.
Pictures: CCC Recreation Center Fireplace | Informational sign in disrepair | Notice the skies clearing
From here, the road winds down to the canyon floor. At the base on the hill you’ll find the Mack Dick Group Pavilion and the Pioneer Amphitheater. The Mack Dick Group Pavilion is a great place for events as it can hold 169 people and has a full-size commercial kitchen. From this parking lot, you can take the Upper Comanche Trail a difficult 3.3 mile one-way trail that takes you half way up the side of the canyon wall. The Pioneer Amphitheater is home to the Texas Outdoor Musical and Shakespeare in the Canyon which run during the summer months (June through August).
Pictures: The Upper Comanche Trail from the Mack Dick Group Pavilion – you can see the road down to the canyon floor in the distance
Let’s Hike!
At the heart of Palo Duro Canyon State Park lies the iconic Lighthouse Rock, a must-visit destination prominently featured in the park’s marketing materials. To beat the midday heat and avoid the crowds, I opted to tackle this trail as my first adventure. It’s a moderate 5.6 miles roundtrip trail, that took me 2 hours 18 minutes to complete and this included a long stop at Lighthouse Rock. Apart from the trail’s length, I found it to be quite easy, except for the final half-mile, which encompasses the majority of the 512 feet elevation change.
As you approach any of the trailheads, you can’t miss the heat warnings and thermometers. Despite it being November, the temperature stood at a comfortable 65 degrees when I began my hike. Being an experienced hiker, I often pass along these safety tips to beginners:
Know your physical limitations and don’t push yourself.
Hiking is not a race, so pace yourself.
Hike with someone and/or make sure you tell someone where you are, when you start, and that you are back safe.
Watch your feet, especially in Texas. Not only should you be aware of rocks, but snakes. I use poles when in areas prone to snakes. Most snakes, like rattlesnakes, will typically move when they feel the ground vibrating from your poles or steps, but copperheads don’t typically move. Juvenile rattlesnakes can be the worst as they have finer fangs to penetrate sneakers and they haven’t learned to control their venom, so they will give you a full dose of venom.
Bring water and snacks for energy. The Texas sun and heat can be brutal, so stay hydrated and remember your body needs fuel.
Check the weather and be prepared. In many areas, storms will come in without advanced notice.
Pictures: Lighthouse Trailhead | Lighthouse Trail
Pictures: Thermometer and warning signs at the trailhead
The morning was absolutely stunning for a hike, and kudos to the park service for an excellent job marking the trails—many markers even include the distance from the trailhead. Early into my trek, the lingering fog dissipated, revealing a picturesque scene. In the snapshots of Lighthouse Rock, you’ll notice clear blue skies adorned with a few wispy clouds high above. As you traverse the canyon floor, be prepared to marvel at the stunning canyon walls, vibrant cacti, and diverse fauna, as well as encounter some animal droppings.
Amidst the beauty, the echoing calls of what seemed like geese high in the sky caught my attention. It fascinated me how the canyon walls magnified their sounds, making the birds surprisingly loud. Continuing my hike, I encountered several dry river beds and I could only imagine how full and dangerous these are when it rains. I did see some signs of the recent rains, but nothing that you couldn’t navigate.
Pictures: Some of the different trail markers and trail guides
Pictures: Cacti | Animal droppings
Picture: Canyon Walls along the beginning of the trail. Also, that’s not Lighthouse Rock – I thought it was at first.Picture: The Beauty of the Canyon Walls
Pictures: Bench and Tree | Another Heat Warning along the Trail – this is a serious situation here!
Picture: More of the Canyon
Pictures: Dry River Bed | The little water I saw on the trail
A New Career: Lighthouse Rock Docent
As you get closer to Lighthouse Rock and as you begin to ascend up the trail, the trail gets much narrower. It wasn’t crowded on the day of my visit, but I can only imagine how challenging this portion of the trail is when there are a lot of people on it. There are a couple of places to rest on your way up to Lighthouse Rock where you get a view of the canyon floor below you.
When you reach Lighthouse Rock, you’ll be directly in front of the rock and as it was around 11 AM when I got there, it was a backlit and not ideal for pictures. So, went around to the left of the rock and then came back and went around to the right of the rock. I’d recommend doing this as it gives you a much better perspective of the rock formation. As you walk around each side of the rock, be prepared as there are no marked trails.
I decided to have a little snack after getting some great pictures of lighthouse rock and before heading back to the parking lot. As more and more people came to the rock, I began to act as a docent, giving them tips on where to go and get pictures of this impressive rock formation. I think I found a new career calling!
Picture: View of the canyon floor belowPicture: Initial view of Lighthouse Rock, with the sun behind the top, causing the photo to be backlitPicture: View of Lighthouse Rock from the left sidePicture: View of Lighthouse Rock from the right sidePicture: Lighthouse Rock
Refueled and recharged after a quick snack, I zipped back to the parking lot with a brisk pace, eager to uncover more adventures. I passed several hikers on the way to Lighthouse Rock, including one couple that had just started their trek, and were already breathing heavily and panting. Needless to say, it became evident why so many cautionary signs. All I kept thinking was of my time on Mt. Kilimanjaro and the guides saying “pole, pole,” in Swahili or “slowly, slowly” – remember this is not a race. Lighthouse Trail was a great way to kick off my visit to Palo Duro Canyon State Park!
Pictures: The Canyon as I hiked back to the Lighthouse Trailhead and Parking Lot
Picture: Palo Duro Canyon from the canyon floor
Rock Garden
As you exit the Lighthouse Trail parking lot, Park Road splits and becomes a large loop. You can go in either direction and I decided to go left and head to Rock Garden Trail. This 2.4-mile one-way trail takes you through an ancient landslide up to the canyon rim, with an elevation change of 600 feet and it is rated difficult. There are several areas to pull off and park here, but no formal parking lot. This trailhead had a thermometer as well and the day was getting warmer – it was now 81 degrees. Time to hydrate!
I decided not to hike this entire trail as I knew I had a major hike and climb in 2 days and I wanted to save my legs and strength for that hike. As I looked up the side of the canyon, there seemed to be some cool and interesting rocks and boulders, so I decided to climb up a portion of the trail. I ended up hiking about 1/2 mile, which gave me some incredible views of the valley below as well as seeing some cool rocks and boulders.
After Rock Garden Trail, the road begins to loop back around towards the entrance. There are several places to park and at one I came across an interesting historical sign about the Battle of Palo Duro Canyon, one of the most significant battles of the 1874-75 Indian Campaign.
Pictures: Rock Garden Trailhead | Trail Thermometer – the temperature is now 81 degrees!
Pictures: Rock Garden Trail
Picture: The canyon below from Rock Garden Trail
Pictures: From Rock Garden Trail | Rock Garden Selfie
Picture: Historical Marker for the Battle of Palo Duro Canyon
The Big Cave
After coming around the bend and heading back towards the entrance, you’ll come to the Big Cave. Although this is on the park map and one of the Points of Interest, it is not well marked, nor is the trail to the cave. There is a picnic table by the side of the road, which is the best indicator that you are in the right place, and you park along the side of the road. It’s a relatively short hike up to the cave and due to the red clay soil, it can be a bit of a challenge – slippery – as you hike up into the cave. At first, I went up the left side of the cave but realized this was not really a viable path to the cave entrance. I end up hiking straight up into the cave. There is a little bit of a boulder scramble, and it looks much worse than it really is. Once in the cave, I was so happy I persevered and would recommend this as a stop.
Picture: Looking up to the Big Cave
Pictures: Going up the left side of the cave | Looking down from the left side of the cave
Pictures: Looking into the Big Cave | Initial view out of the Big Cave
Picture: Inside of the Big CavePicture: Looking out from the Big CavePicture: The side of the Big Cave entrance
After the Big Cave, I continued along Park Road on the floor of the canyon stopping at the Lone Star Interpretive Theater, the Old West Stables, and the Trading Post for more views of the canyon before I headed back up to the Visitor Center and for the last hike of my day.
Pictures: View of Palo Duro Canyon | One of the many informational signs
Picture: Final view of the canyon from the canyon floor before I headed back to the Visitor Center
CCC Trail
Embarking from the Visitor Center, the CCC Trail stretches 1.4 miles one-way, with a descent of 500 feet, earning its difficult rating. The journey takes you across four historical CCC bridges and through four distinct geologic layers, from the canyon rim to the floor below. Despite its challenging label, I didn’t find the trail overly strenuous. Having already explored the canyon floor, I decided to forego the final descent but covered a mile of the 1.4-mile trail. With a massive hike looming in two days, I wanted to conserve energy and focus on preserving my legs.
Completing the 2-mile out-and-back hike in a brisk hour, I highly recommend this trail if time allows. It treats you to some of the most breathtaking views of the canyon, offering unique perspectives of Park Road winding its way down to the canyon floor. Don’t forget to explore the various viewpoints along the trail; they might not be directly on the path, but they offer unparalleled glimpses of the canyon’s beauty.
Pictures: The view at the top of the CCC Trail
Picture: Looking back at the beginning of the CCC Trail and one of the geological layers
Pictures: The first of four CCC Bridges that you’ll cross
Picture: View Point just off the trail
Pictures: View of the Canyon as you hike down
Picture: Another CCC BridgePicture: Amazing view of Palo Duro Canyon
Pictures: Park Road winding down to the Canyon floor
Pictures: Trail Marker | Cool tree on the edge of the canyon
Picture: Where I turned around on the CCC Trail, just before the final descent to the canyon floor
So, gear up for an unforgettable adventure at Palo Duro Canyon State Park! Dive into a multi-day expedition, setting up camp right in the heart of this natural wonderland. Imagine waking up to the breathtaking beauty each morning, ready to conquer a different trail each day. Trust me, it’s not just a trip; it’s a journey that promises to etch a lifetime of vivid memories into your soul. Don’t miss out—seize the opportunity for an immersive experience that will linger in your heart forever!