Natural Bridge in Virginia is a geological marvel, standing at 215 feet high and 90 feet wide, carved by Cedar Creek. This natural limestone arch was considered sacred by the Monacan Indian Nation. George Washington surveyed the bridge for Lord Fairfax in 1750. Legend has it that Washington carved his initials into the rock, which visitors can still see today. Oh George, defacing our natural resources? 🤦♂️ Maybe the story about him chopping down his father’s Cherry Tree wasn’t a myth? In 1774, Thomas Jefferson purchased the bridge and 157 surrounding acres for 20 shillings, about £1 or $4.44 or roughly $7,200 today with inflation. Quite a steal for the bridge! The site also boasts rich biodiversity, with rare plants and wildlife. Natural Bridge became a National Historic Landmark in 1998, reflecting its historical and cultural significance.
Picture: The Natural Bridge
Camping Adventures
The night before my park visit, I stumbled upon Thunder BRidge Campground, a gem I found on HipCamp. This 100-acre site has quite a history—originally built by the Civilian Conservation Corps in the ’30s, then a boys’ juvenile detention center and a Big Brothers/Big Sisters camp until 2009. Thunder Bridge offers private tent sites, cozy cabins in the woods, and spacious RV spots on a well-kept green space. The host, Adam, was uber friendly, super chill and helpful.
I met Adam at the entrance and arranged to buy some firewood from him. Note: Always buy local firewood to avoid spreading invasive species—many parks ban non-local wood. Adam drove me to my cabin, Woodpecker 1, and dropped off the wood. I chose a cabin because it wasn’t much more expensive, and I didn’t want to hassle with setting up a tent for just one night. The cabin was spacious, had all I needed, and the bathhouse wasn’t far away, complete with a communal room to charge my phone and laptop.
Pictures: Woodpecker #1
Hungry upon arrival, I used some farm-fresh eggs from my previous Airbnb host to make a delicious egg sandwich. Later, I steamed tamales I’d picked up during my travels. Who says you can’t eat well while camping? It was a chilly night in early October, but I survived and enjoyed the adventure!
Pictures: My Egg Sandwich | Cooking Tamales over the Fire
Pictures: My campsite with the wood from Adam | I love making campfires!
Not All Natural Bridges Are Created Equal
A few months back, I had an amazing time at Kentucky’s Natural Bridge, so I was super pumped to check out Virginia’s version. Spoiler alert: it didn’t quite live up to the hype. Sometimes, beautiful spots get too popular and end up feeling more like theme parks than natural wonders, and that was definitely the vibe here. Let’s just say, Virginia’s Natural Bridge won’t be making my list of favorite state parks.
Pictures: The Visitor Center | LOVE sculpture next to the Visitor Center
First off, the entrance fee. If you’ve read my other posts, you know how I feel about high entrance fees. Sure, parks need money for upkeep, but charging $9 per person (13 and over) can make it pretty pricey for families, especially those on a budget. It gave me flashbacks to the pricey Flume Gorge in New Hampshire.
At the Visitor Center, you’ll find the usual suspects: a gift shop, exhibits, and restrooms. From there, it’s a trek down 137 steps to the Cedar Creek Trail. There are a few other trails in the park, but Cedar Creek Trail is the main event. It’s a fairly easy 2.0-mile round trip with a 400-foot elevation change—most of which is tackled by those stairs down to the Trail Store, where you pay your $9 fee at a small window.
Pictures: The start of the walk down to the Trail Store
Picture: Trail Map
A short walk from the store brings you to the Natural Bridge. It’s a cool geological formation, carved over millennia, but it didn’t quite wow me like Kentucky’s. And here’s where things get a bit theme park-ish: rows of benches and spotlights facing the bridge. For almost a century, the bridge has been illuminated on the last Saturday night of every month from April to October. They recreate the first light show from 1927, with the 200-foot-tall arch lit from above and below while Cedar Creek murmurs below. Sounds kind of magical, right? But still, at $9 a pop, it feels a bit commercial.
Pictures: The Natural Bridge – complete with a spotlight in the foreground | Natural Bridge from the other side – notice all the benches at the end of the trail
A Journey Through Time
Walking along Cedar Creek Trail at Natural Bridge State Park in Virginia is like stepping back in time. The trail offers a glimpse into the rich history of the Monacan Indian Nation through its living history exhibit, although it was closed during my visit. This exhibit usually showcases the Monacan way of life, offering insights into their daily activities, traditions, and skills. But based on the pictures, needs a little work.
Pictures: The Monacan Indian Exhibit
Continuing along the trail, you’ll encounter the Saltpeter Cave, a significant historical site used during the War of 1812 for mining saltpeter, a key ingredient in gunpowder. Cool history, but not much to it. Next, you’ll reach Lace Falls, a 30-foot waterfall that provides a serene and picturesque stop. It was nice, but wouldn’t hit my top 100 waterfalls that I have seen.
Pictures: The Saltpeter Cave
Pictures: Views along Cedar Creek Trail
Pictures: Cool Rock on the Trail | Asters or Symphyotrichum
Picture: Lace Falls
Lastly, the trail features the mysterious “Lost River,” which disappears underground, adding an element of natural wonder to your hike. Each of these sites along Cedar Creek Trail tells a unique story, weaving together the area’s cultural and natural heritage.
Pictures: The “Lost River”
I finished my visit back at the Visitor Center to buy some postcards and use the restroom. And since I was there, I decided head downstairs and check out the exhibits. The staff was super cool and showed me the star of the exhibits, a beautiful Eastern Indigo Snake, by the name of Margarita.
Picture: Margarita
Bookend Adventures: The Acorn Inn
Outside of Margarita and yes, the actual Naturall bridge, the hightlights of this trip were camping the night before and then my stay afterwards. Venturing northeast along the Blueridge Parkway from Natural Bridge State Park, I landed in the quaint hills of Faber, Virginia, at the Acorn Inn Bed & Breakfast, about an hour and a half away.
Picture: The Acorn Inn Bed & Breakfast
Nestled amidst the charming hills, Martin and Kathy run this delightful retreat with warmth and flair. Surrounded by lush forests and vineyards, the inn offers a serene escape. Each morning, Kathy’s homemade breakfasts tantalized my taste buds, while Martin brewed some coffee and shared stories and local tips. Turns out, Kathy’s brother shared my college alma mater and major—a small world indeed!
Picture: My Room at the Acorn Inn
Pictures: The Hallway – look at how wide the “stable” doors are! | Communal Men’s Bathroom
Pictures: Communal Living Room | Kitchen (FYI – not set up for cooking) | Banquet Room
Pictures: Outdoor Spaces
With the whole inn to myself for three nights, I soaked in the tranquility. My photos capture the cozy common areas and perfect porch relaxation spots, showing the charm and character oozing from every corner of the inn. How cool is it that the inn was once a stable, transformed by Martin himself? Martin’s craftsmanship is just the start—Kathy’s talent as an artist and photographer shines through the beautiful pieces adorning the walls. I wanted to buy so many of her art pieces! Before opening the Acorn Inn, they lived and worked in Mexico and South America, so the walls are also adorned with folk art, masks, and tapestries from their travels. It’s the perfect spot for remote work and nearby adventures, like exploring the charming town of Nellysford. I couldn’t resist grabbing wine and snacks from Basic Necessities. If you’re in the area, do yourself a favor and check out the Acorn Inn Bed & Breakfast! You won’t regret it.
Pictures: Some of Kathy’s Artwork
Pictures: Some of the Folkart from their Travels & Life in Mexico and South America
Picture: Basic Necessities in Nellsyford | VA
Wrapping Up the Adventure!
As we wrap up this adventure, let’s take a moment to reflect on the highs and lows, the triumphs and tribulations. While Natural Bridge State Park didn’t quite knock my socks off like we hoped (cue sad trombone), my journey wasn’t all doom and gloom. Oh no, my friends, Thunder BRidge Campground was an uber cool find and nestled in the hills of Faber, Virginia, lies a hidden gem—the Acorn Inn Bed & Breakfast, run by the dynamic duo, Martin and Kathy. After all, life’s too short for boring adventures! 🌟
One of my all-time favorite chefs and globetrotters was the legendary Anthony Bourdain. He once said, “Travel isn’t always pretty. It isn’t always comfortable. Sometimes it hurts, it even breaks your heart. But that’s okay. The journey changes you; it should change you. It leaves marks on your memory, on your consciousness, on your heart, and on your body. You take something with you. Hopefully, you leave something good behind.”
Now, let’s talk about Cape May, New Jersey. This little beach hamlet managed to break my heart in ways I didn’t see coming. Sure, the journey was fun and educational, but it was also like an unseasoned clam chowder – something was missing. Granted, I visited during the off-season, which meant fewer crowds but also fewer attractions. But honestly, after hearing my travel buddy’s tales of the summer madness in these beach towns, I’m pretty relieved I dodged the peak tourist frenzy. Cape May might not have lived up to the hype, but hey, at least I got a history lesson out of it!
Picture: Map of Cape May
When on Holiday. . .
A little background on this excursion – I was visiting my buddy Phil and his wife Amanda in Lewes, Delaware. With Amanda tied up at work, Phil and I seized the opportunity for a boys’ day out, setting our sights on Cape May. Our journey began at the Lewes Ferry Terminal, one of the nicest I’ve seen, and the On the Rocks Dockside Grill. Now, ferry protocol: arrive early, check in, line up the car, head inside to chill, and wait for the call. And since work was the last thing on our minds, we cozied up to the bar for some top-notch Bloody Marys because, hey, when on holiday, it’s practically the law! Here is a link to the Cape May – Lewes Ferry.
Pictures: The Lewes Ferry Terminal
Pictures: The Lewes Ferry Terminal | The Breakfast of Champions
The “Call”
It’s like the iconic moment at the Indy 500 when they holler, “Drivers, Start Your Engines!” But here, at the ferry terminal, it’s our turn. A crackle over the PA system signals it’s time to hustle to our cars and prepare to board. These salty sailors work their magic, seamlessly ushering vehicles onto the ferry. Once aboard, we ascended to the upper deck, ready to soak in the 85-minute voyage to Cape May. Despite the November chill nipping at our noses, we braved the brisk air for a while before retreating indoors to explore the ship and chill a bit more. I bet the trip in the summer is even more amazing. But, alas, we made do. And just like that, as the shoreline drew near, the call echoed once more, beckoning us back to our car for the next leg of our adventure.
Pictures: Boarded and set to go! | Looking back at Lewes
Pictures: Bundled up for the Crossing | Approaching the Cape May Ferry Terminal | Passing a Ferry
Farm-to-Bottle
Southern New Jersey boasts rich farmland, offering bountiful harvests of fresh produce. This fertile region is known for its vibrant, community-driven agricultural traditions. Here, farmers cultivate a bounty of crops, from juicy tomatoes to sweet corn, under the sun-drenched skies of the Garden State.
Our next stop was Nauti Spirits, a true farm-to-bottle operation, which is also one of NJ’s largest distilleries, with two massive all-copper pot stills and a column still. It is located on a bucolic 60-acre coastal working farm that sits between the Atlantic Ocean and Delaware Bay, less than 5 minutes from (and between) downtown Cape May and the Cape May – Lewes Ferry. The distillery is unique in NJ, as they use much of what they grow on their farm to produce their spirits.
Picture: Nauti Spirits Distillery
Pictures: Cool Vibe inside Nauti Spirts
Walking in, you’re hit with that vibe—cool, laid-back, and totally inviting. The staff? Top-notch. The place? Gorgeous, with sunflowers swaying in the breeze like a scene from a postcard. We sampled their spirits, and while they were good, let’s just say the bourbon left a little something to be desired for the price. But hey, it’s all about the experience, right? So we kicked back, sipping our cocktails, soaking in the vibe, and reveling in the beauty of local agriculture. Cheers to that!
Pictures: Sunflowers at Nauti Spirits | Bourbon on the Rocks and a Nauti Mule
Not So Lucky
Our stomachs growling, we decided to grab a bite before diving into our Cape May adventure. The chosen spot? Lucky Bones Back Water Grill. Not that it would matter to me (I’m a pescatarian), but with a name like Lucky Bones and the aroma of a pit barbecue as you stepped out of your car, you’d think the menu would scream BBQ. Spoiler alert: BBQ wasn’t the star of this show.
Curious about the quirky name, I found out that “Lucky Bone” refers to the peculiar hook-like claw of the male horseshoe crab. Back in Cape May’s whaling days, sailors deemed these claws lucky charms, taking them to sea for protection. Hence, the name “Lucky Bones.”
Pictures: The “Sargeant Joe Friday” Mahi Sandwich | Beer with more Personality
Back to our dining experience: we opted for bar seating, as the dining room felt like a relic from another era—eerily cavernous and devoid of charm. The menu? A nostalgic trip to the 1980s, alongside Banana Seat Bikes, Miami Vice suits, and leg warmers. The food was just okay—nothing disastrous, but certainly nothing to write home about. I ordered a Mahi sandwich with house-cut fries. Note to restaurant owners: if you’re going to boast about house-cut fries, make sure you know how to cook them properly! The sandwich itself was as bland and uninspired as Sergeant Joe Friday from Dragnet. At least the beer had a bit of personality, which was more than I could say for the rest of the meal.
A Step Back in Time
Cape May is home to one of the highest concentrations of Victorian homes (second only to San Francisco), drawing visitors from all over. We parked near the Washington Street Mall—a pedestrian promenade brimming with unique shops, quirky boutiques, a variety of restaurants, and laid-back bars. We decided to dive in and explore. The mall had some cool spots but didn’t quite blow us away, so we wandered into the Historic District. The tree-lined streets were dotted with Victorian homes, most of them impressively well-maintained. These ornate, colorful houses definitely added a touch of charm and old-world elegance to the area and I get why people are drawn here.
Picture: Victorian Home in Cape May | NJ
Picture: Victorian Homes in Cape May | NJ
Sun, Sand, and Surf
No visit to Cape May is complete without hitting its pristine beaches—though maybe when it’s a bit warmer! On Cape May Beach, we stumbled upon a quirky beach bunker, a World War II relic standing strong against time and tides. This concrete sentinel adds a dash of history to the sandy shore, perfect for snapping unique photos or pondering its storied past while soaking up the sun. We’d dive deeper into history the next day at Cape Henlopen State Park in Delaware, discovering how differently the two states approach these historic sites. Sorry Jersey, Delaware has you beat here.
Picture: Cape May Beach
Pictures: Cape May Bunker | Cape May Bunker and Lighthouse
Beacon of History
Our final pit stop: the Cape May Lighthouse, a beacon calling out to explorers like us. Built in 1859, this iconic landmark boasts a height of 157 feet and a staggering 199 steps to the top. Its guiding light once served as a vital navigational aid for ships sailing along the bustling East Coast. While we missed the chance to peek inside, its majestic presence alone was worth the visit.
Pictures: Two views of the Cape May Lighthouse
Pictures: From Cape May’s Maritime Past
Adventures in Okay
As Anthony Bourdain wisely said, “Travel isn’t always pretty…but that’s okay.” So, let’s talk about Cape May, New Jersey. Sure, it didn’t steal the show for me, but hey, that’s part of the adventure, right? From exploring quirky beach bunkers to tasting local spirits, it was a journey sprinkled with surprises and lessons learned. Each stop, whether stellar or just okay, added a new chapter to my story. And isn’t that what travel’s all about? Happy Travels!
Hiking the Elfin Forest: A Day of Adventure and Nature Wonders
If you’re craving an adventure that blends nature’s beauty with a solid workout, hiking at Elfin Forest Recreational Reserve is a must. On my most recent hike, I made my way up the Botanical Trail, transitioned to the Way Up Trail, looped toward the Lake Hodges Overlook, and then descended back down the Way Up Trail. Altogether, it’s a route that delivers steady elevation, wide-open views, and just enough challenge to feel earned.
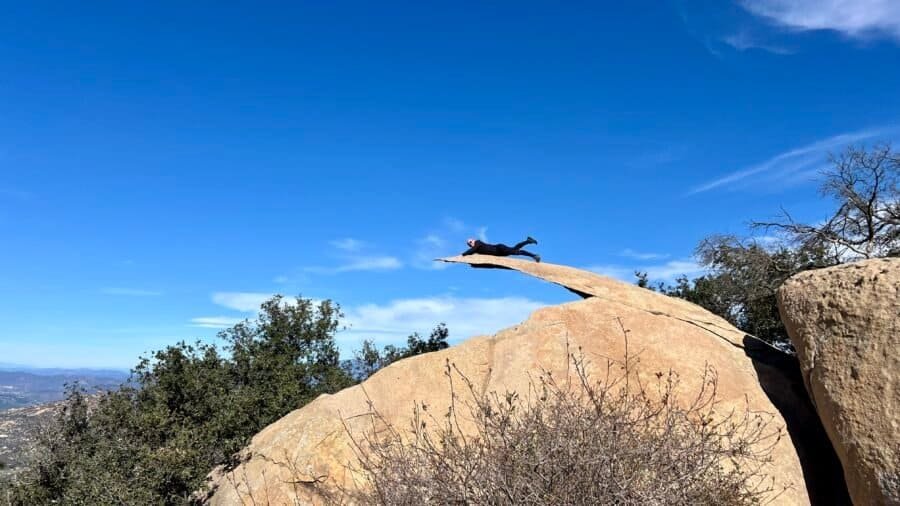
Some places become famous quietly. Others explode thanks to Instagram, hashtags, and gravity-defying photos. Potato Chip Rock is firmly in the second category.
Normally, I avoid viral trail spots like the plague. Between the wannabe influencers, endless selfies, and people blocking narrow trails for “just one more shot,” it can feel like more work than fun. But every once in a while, curiosity wins. And honestly? This one earned its hype.
Add in the fact that it’s a legit cardio workout, and suddenly I was in. So yes — I did take that photo on Potato Chip Rock. No, it never made it to Instagram.
Mission Trails Regional Park | Five Peaks and a Story Years in the Making
It didn’t start out as anything more than a single hike.
On February 23, 2024, my sister Vicki and I went up Cowles Mountain—one of those San Diego classics that feels almost too easy to take for granted until you’re standing at the top, wind in your face, looking out at a city that suddenly feels smaller.
Hiking, even on a seemingly simple day trip, demands preparedness. Nature’s unpredictability underscores the importance of being equipped and knowledgeable, ensuring a safe and enjoyable outdoor experience.
Packing the essentials is paramount. Start with navigation tools like a map and compass or a GPS device, coupled with the skills to use them effectively. Sun protection such as sunscreen, sunglasses, and a hat shield against harmful UV rays, while appropriate clothing and footwear provide comfort and protection against changing weather and rough terrain. Hydration is key; carry an adequate water supply and a means to purify more if needed. Nourishment in the form of energy-rich snacks helps sustain energy levels during the hike. And last, but certainly not least, pack a first aid kit for EACH trip. The longer the trip and the more people you are responsible for, the larger the First Aid Kit should be.
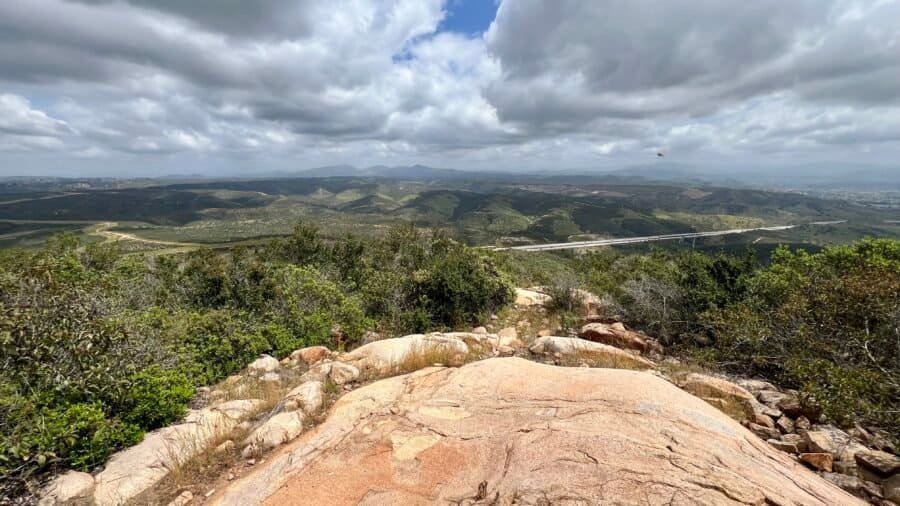
Welcome to a slice of Southern California’s coast where lagoon trails, sandstone walls, and ocean air all come together in one surprisingly compact hike.
Tucked between Solana Beach and Encinitas, Annie’s Canyon is one of those places that feels like a hidden gem the first time you visit — playful, a little adventurous, and full of contrast. In just a few miles, you’ll move from wide-open wetlands to narrow slot canyon walls, with the option to finish the day all the way out at Cardiff State Beach.
It’s the kind of hike that delivers variety at every turn, proving that you don’t need long miles or big elevation to have a memorable coastal adventure.
Picture: Entrance with the City of Rocks in the distance
A Tale of Two CIties
As I sit here, I grapple with finding the words to capture the essence of this State Park. I want to remain positive, despite these arduous times where negativity often feels easier. So much like the opening lines of Dickens’ masterful narrative, A Tale of Two Cities, one could say that my experience embodies a paradoxical duality: “It was the best of times, it was the worst of times.” With that profound prelude, let’s embark on this journey and explore City of Rocks State Park.
A little about the park from their website
The park encompasses a one-square-mile area in the scenic Chihuahuan desert region of southwestern New Mexico at an elevation of 5,200 feet. The “city” is a geologic formation made up of large, sculptured rock columns, or pinnacles, rising as high as 40 feet and separated by paths or lanes resembling city streets and a city skyline. These rocks were formed about 34.9 million years ago when a very large volcano erupted. Then, erosion over millions of years slowly formed the sculptured columns seen today, creating a stunning, otherworldly landscape.
Located about halfway between Silver City and Deming, City of Rocks offers over 50 campsites, hiking trails, excellent mountain biking, wildlife viewing, birding, stargazing, picnic areas, and a desert botanical garden. The uniquely designed, new Visitor Center includes a large display area and modern restrooms with hot showers. The park charges a Day Use Fee of $5 per vehicle.
Pictures: Entrance with Visitor Center in the Background | Mural at the Visitor Center
Getting there and the Visitor Center
The night before my visit I stayed in Las Cruces, New Mexico, the second largest city in New Mexico. I remember Las Cruces fondly from childhood as we took a day trip to nearby White Sands National Park while visiting friends in El Paso, Texas. To get to the park from Las Cruces, you need to head west on Interstate-10 to Deming, which takes about 1 hour and 30 minutes and you’ll also pass through a US Customs and Border Patrol (CBP) checkpoint. Bet you didn’t know their jurisdiction spans 100 miles into the interior of the United States from any land or maritime border. Considering two-thirds of the U.S. population falls within this zone, you may want to read about their authority and your rights. Anyway, from Deming, it’s still a long drive to the park entrance and then a bit more to the visitor center.
I chatted with this really nice volunteer at the visitor center who gave me the lowdown on the park. She asked if I wanted to watch a 10-minute video about the park, and even though I wasn’t thrilled about it, I said yes because I could tell it was important to her. When I sat down to watch it, I felt like I had been thrown back in time – there were just a few chairs around a small TV and DVD player – something reminiscent of grade school.
Picture: Park Map – pretty easy not to get lost here
Why New Mexico?
While not exactly the Bastille, my visit to what felt like the Start Park Prison had me questioning if I had unwittingly stumbled into a rocks-and-boulders-themed incarceration. Imagine exploring the rocks or “the city,” only to discover that the campsites are cleverly hidden within the very rocks you’re trying to admire and to unknowingly gatecrash someone’s camping turf – talk about awkward rock encounters. Luckily, there were only a few campers during my visit. Now, if the park was bursting at the seams with campers, navigating the rocky metropolis would be a bizarre dance of dodging tents and campers – not my idea of a fun park visit. And consider the reverse: camping amidst the rocks, only to have enthusiastic rock enthusiasts meandering through your campsite – a perplexing scenario, indeed.
I just don’t understand why the State decided to do this? Why not keep the campsites in the serene outskirts, letting people camp in peace and explore the “city” without inadvertently intruding on someone’s tent/camper territory? After all, the “city” is THE focal point and reason to visit this park, you’re not coming here to stroll around campsites.
Pictures: Some of the campsites you’ll encounter
Pictures: More campsites you’ll encounter
Let’s get out of the city
Shortly into my walk through the rocks, I decided I needed a change of pace and decided to head towards the back of the “city” to the Hydra and Table Mountain Trailheads. My legs were feeling a bit like Jell-O from my hike the day before – Guadalupe Peak – so I wasn’t sure how far I would hike, let alone go up to Table Mountain. It’s 1.87 miles up to Table Mountain, with the last 1/4 mile having the largest elevation change. The trails are well marked and also dual-use – both for hiking and mountain bikes – so keep an eye out for bikers. I found it ironic that these trails were marked better than Guadalupe Peak, but much harder to get lost here. As you hike along the trails, you’ll see some cool desert floral and fauna, as well as some wildlife – holes in the ground.
Pictures: Some of the boulders on the “outskirts” of the city | Hydra Trail Directional Sign
Pictures: Hydra and Table Mountain Trailheads | Another campsite near the Trailheads
Pictures: Soaptree Yucca | A critter hole
Pictures: Another Hydra Trail Marker | Where Table Mountain Trail and Hydra Trail split | In both pictures Table Mountain is in the background
Picture: Looking up at the left side of Table Mountain and the trail to the summit
Worth the Hike!
As you start to ascend from the desert floor, the impressive scale of the “city” becomes apparent. The trail leading up to the summit is a gradual incline, with a few resting spots along the way to catch your breath and admire the views. There are also some sections of the trail that may make you wonder how mountain bikers navigate through them. The ascent to the summit has an elevation change of 695 feet and treats you to breathtaking views of the Chihuahuan Desert and the City of Rocks – definitely one of the highlights of my trip. Once at the top, I took a quick break before running back down the trail, which was a fun experience, despite my legs feeling like Jell-O and not having my knee braces on.
Pictures: View as you begin to rise above the desert floor | The trail
Pictures: One of the resting areas | The last push up to the summit
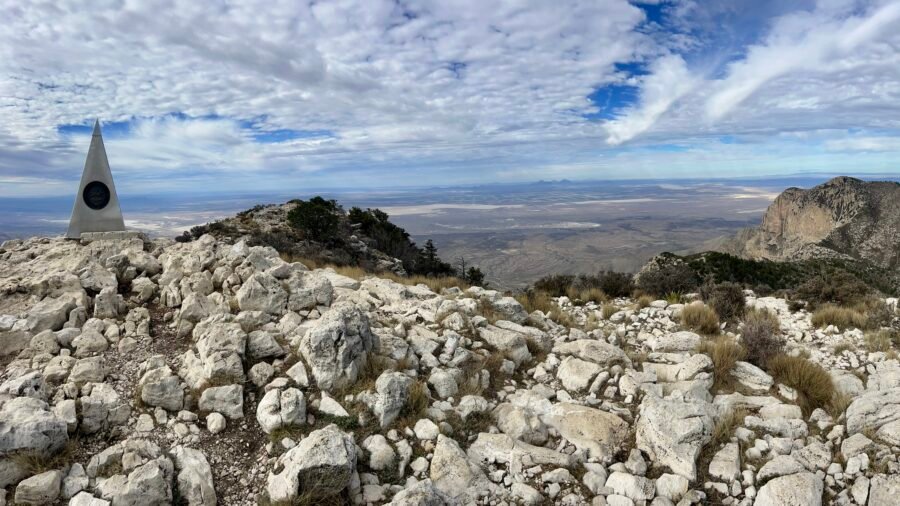
Picture: View from the summit with “City of Rocks” in the distance
Pictures: Summit Selfie | Looking down (It’s much higher than it looks in the picture)
Picture: Another view from the summit showing the vastness of “City of Rocks”
Picture: Another spot to rest | The desert below
Picture: The beautiful Chihuahuan Desert
The Desert Botanical Garden
Exploring the Desert Botanical Garden proved fascinating; it offered insights into the local fauna, and the opportunity to wander among rocks without maneuvering through campsites. They’ve got a couple of picnic tables too, so I grabbed my lunch there. It was a good spot, even though it was right by the dirt road. And it was peaceful until some yahoo in a pickup truck decided to blast up the road, kicking up sand and dirt in my direction. Seriously Dude?!
Pictures: The Botanical Garden | Info about the Chihuahuan Desert
Pictures: Barrel Cactus | Cholla Cactus
Pictures: Parry’s Agave | Cow’s Tongue Cactus
Pictures: Sotol | Engelmann’s Prickly Pear
Pictures: Rocks near the Botanical Garden, sans campsites
Pictures: More rocks near the Botanical Garden, sans campsites
Pictures: Picnic Area | Cool, almost petrified, trunk of the tree near the picnic tables
Let’s Tour the City – complete with City Folk!
After lunch, I headed down the trail right across from picnic tables, and into the heart of the “city.” The trail is about 1.4 miles out and back, but you’ll probably end up hiking more as the trail isn’t well marked and you just end up meandering through the rocks. It’s amazing to think as you walk around these massive boulders that they have spewed from a volcano millions of years ago. As I wandered around, I felt like I was in a city – complete with kid’s screaming and yelling at each other as they ran through the boulders and climbed on them. Ah, city folk.
Pictures: Trailhead | Part of the trail through the “City”
Pictures: Meandering through the “City”
Pictures: Some of the more interesting Rocks
Picture: Table Mountain from the “City”
Stars and Planets
The first state park astronomical observatory, equipped with a 14’’ Mead Telescope powered by solar energy, is located in the City of Rocks State Park, New Mexico. It offers a unique opportunity to observe planets, stars, and constellations. Together with the National Public Observatory, the park organizes a monthly Star Party, featuring programs that typically extend over a 2-hour duration. Informative signs about various planets are placed in the vicinity of the observatory. Interestingly, it was near the Observatory that I encountered wildlife, spotting a beautiful rabbit among the distinctive boulders.
Pictures: The Observatory | Planetary Informational Sign – this one is for Pluto
In Summary
City of Rocks State Park stands as a fascinating testament to the wonders crafted by Mother Nature while showcasing desert flora and fauna. But I would deem this a People’s Park and honestly, if I weren’t looking for a place to camp, I wouldn’t go out of my way to visit the park. Perhaps a convenient stopover on a trip to the Gila National Forest or if you happen to be exploring nearby Hatch, New Mexico, renowned for its famous Hatch Chile. While not claiming expertise, I can’t help but feel that a more thoughtfully designed park could enhance the overall experience. Perhaps it has something to do with the fact that State Parks fall under the jurisdiction of the Energy, Minerals and Natural Resources Department?
At 8,751 feet above sea level, Guadalupe Peak stands as the highest point in Texas, ranking #14 among U.S. state high points under 10,000 feet. It’s located inside Guadalupe Mountains National Park and marked my 27th state high point.
The day I hiked Guadalupe Peak was filled with emotion. I had read plenty of reviews on AllTrails — my go-to hiking resource — and a few of them planted some doubt. One comment stuck with me: “The last 100 yards are a bit scary as you can see a long way down and the rocks are slick.” Combine that with an 8.4-mile out-and-back trail and nearly 3,000 feet of elevation gain, and yes — I was nervous. I even had flashbacks to my climb up Mt. Katahdin on Abol Trail.
In the end? Was it hard? Heck yeah. Was it as hard as Katahdin? Not even close. Was I glad I did it? One word: Ecstatic.
The night before I visited Palo Duro Canyon State Park, I stayed in Amarillo, just a short 25-minute drive to the park entrance. When I arrived in Amarillo, the skies were blue, but that morning I woke to dense fog. With the hope of the fog burning off, I ventured out early, only to be greeted by a Texan wake-up call: a lingering essence of cow manure, an aromatic reminder of cattle country.
From Amarillo, I drove south on Interstate 27, then east on Texas 217, a two-lane road. One of the things I appreciate about driving in Texas is the speed limit – 75 mph on both roads! About a mile from the park entrance, you get a glimpse of what you are about to see, and at the time I was thinking how awesome it was going to be.
The Hype is Real!
Palo Duro Canyon State Park lives up to the Texas hype. Known as the “Grand Canyon of Texas,” Palo Duro Canyon, at 120 miles long, and 20 miles wide, is the second largest canyon in the country. The park spans over 28,000 acres and includes 60 miles of the canyon that reaches depths of 800 feet. Home to the iconic Lighthouse rock formation, the park offers 30 miles of hiking, biking, and equestrian trails, many of which traverse million-year-old rock formations. The park’s scenic drive covers 16 miles, providing panoramic views of the canyon’s majestic red cliffs and vibrant colors. Palo Duro Canyon offers a variety of camping options, from primitive sites to RV hook-ups, allowing visitors to immerse themselves in the tranquility of the surroundings. As the site of the renowned Texas Outdoor Musical at the Pioneer Amphitheatre, the park combines natural beauty with cultural entertainment. Access to the park costs $8 per person for a day pass, with complimentary admission for children aged 12 and under. Holders of the Texas State Park Pass also enjoy free entry.
The Civilian Conservation Corps (CCC) played a vital role in the development of Palo Duro Canyon State Park, Texas, during the 1930s. CCC workers constructed trails, bridges, and buildings, enhancing accessibility and preserving the park’s natural beauty. Traveling from one state park to another, many a testament to the CCC’s dedication and the hard work of its young men, I am struck by the invaluable contribution to conservation. The enduring legacy of the CCC is evident in the transformative impact on parks, promoting environmental stewardship and recreation. These parks stand as vital green spaces, nurturing physical and mental well-being for generations to come.
Picture: The Park Entrance – notice the overcast/foggy morning
Top 5 Activities at Palo Duro Canyon State Park
Hiking:
Palo Duro Canyon boasts numerous hiking trails, ranging from easy walks to challenging hikes. The Lighthouse Trail is particularly famous for its iconic rock formation, but there are many other trails with varying lengths and difficulty levels to explore. And as you hike, the park has several geocaching sites to discover and part of the Texas State Parks Geocache Challenge.
Scenic Drives:
The park features a scenic drive that offers breathtaking views of the canyon. The Palo Duro Canyon State Park Scenic Drive is a 16-mile route that allows visitors to appreciate the stunning landscapes and geological formations from the comfort of their vehicles.
Mountain Biking:
Mountain biking enthusiasts can enjoy the park’s designated biking trails. The terrain provides a mix of challenges suitable for different skill levels. Make sure to check for trail conditions and any specific regulations before heading out with your bike.
Camping:
Palo Duro Canyon State Park offers various camping options, including tent camping and RV camping. The park has both developed and primitive campsites, allowing visitors to immerse themselves in the natural surroundings. Reservations are recommended, especially during peak seasons.
Cultural Performances:
The Texas Outdoor Musical, hosted at the park’s Pioneer Amphitheatre, is a popular event that provides entertainment and a glimpse into the area’s history. The musical, known as “TEXAS,” celebrates the pioneer spirit and features live performances against the stunning backdrop of the canyon.
Longhorns, again?!
As you enter the park, you are greeted by several members of the official State Longhorn Herd. They represent the history of longhorns in the area, which roamed here for 200 years and were part of the Old JA Ranch, which was headquartered in the canyon and one of the greatest cattle operations in the world. I am happy to report, that unlike my longhorn encounter on Mount Rogers in Virginia, these longhorns were in a corral and a bit further away.
Pictures: Longhorns | About the Old JA Ranch
I headed over to the Canyon Gallery & Visitor Center, just a short drive into the park—something I always suggest checking out when exploring a new park. The road leading to the visitor center is one-way with an upper parking lot by the observation point and a smaller lot down the hill. Inside, the Gallery showcases historical videos, archaeological and nature exhibits, and features a beautifully arranged display of Southwest art for sale, including handmade Native American pottery, Navajo, Zuni, and Santo Domingo silver and turquoise jewelry, hunting knives, and a unique selection of hard-to-find regional tools like Comanche and Kiowa beaded items, along with t-shirts and hats. The gentleman at the gallery, who shared some info about the park, was really pushing to sell items. I ended up getting a few postcards, though not exactly what he was suggesting. I did discover that the park is an in-and-out park, meaning the road is a loop and there is only one way in and one way out.
Pictures: The Visitor Center & Canyon Gallery (left picture courtesy of Palo Duro Canyon Foundation)
As I continued to tour the park, I saw a lone fireplace, the remains of a recreation center built by the CCC. The CCC constructed their own barracks, a mess hall, a blacksmith shop, a tool shed, and a recreation center before they began work on the park. They spent their downtime at the recreation center, playing games and socializing. I will have to say, if it were not for the internet, I would not have known this as the informational sign for this point of interest was in disrepair.
Pictures: CCC Recreation Center Fireplace | Informational sign in disrepair | Notice the skies clearing
From here, the road winds down to the canyon floor. At the base on the hill you’ll find the Mack Dick Group Pavilion and the Pioneer Amphitheater. The Mack Dick Group Pavilion is a great place for events as it can hold 169 people and has a full-size commercial kitchen. From this parking lot, you can take the Upper Comanche Trail a difficult 3.3 mile one-way trail that takes you half way up the side of the canyon wall. The Pioneer Amphitheater is home to the Texas Outdoor Musical and Shakespeare in the Canyon which run during the summer months (June through August).
Pictures: The Upper Comanche Trail from the Mack Dick Group Pavilion – you can see the road down to the canyon floor in the distance
Let’s Hike!
At the heart of Palo Duro Canyon State Park lies the iconic Lighthouse Rock, a must-visit destination prominently featured in the park’s marketing materials. To beat the midday heat and avoid the crowds, I opted to tackle this trail as my first adventure. It’s a moderate 5.6 miles roundtrip trail, that took me 2 hours 18 minutes to complete and this included a long stop at Lighthouse Rock. Apart from the trail’s length, I found it to be quite easy, except for the final half-mile, which encompasses the majority of the 512 feet elevation change.
As you approach any of the trailheads, you can’t miss the heat warnings and thermometers. Despite it being November, the temperature stood at a comfortable 65 degrees when I began my hike. Being an experienced hiker, I often pass along these safety tips to beginners:
Know your physical limitations and don’t push yourself.
Hiking is not a race, so pace yourself.
Hike with someone and/or make sure you tell someone where you are, when you start, and that you are back safe.
Watch your feet, especially in Texas. Not only should you be aware of rocks, but snakes. I use poles when in areas prone to snakes. Most snakes, like rattlesnakes, will typically move when they feel the ground vibrating from your poles or steps, but copperheads don’t typically move. Juvenile rattlesnakes can be the worst as they have finer fangs to penetrate sneakers and they haven’t learned to control their venom, so they will give you a full dose of venom.
Bring water and snacks for energy. The Texas sun and heat can be brutal, so stay hydrated and remember your body needs fuel.
Check the weather and be prepared. In many areas, storms will come in without advanced notice.
Pictures: Lighthouse Trailhead | Lighthouse Trail
Pictures: Thermometer and warning signs at the trailhead
The morning was absolutely stunning for a hike, and kudos to the park service for an excellent job marking the trails—many markers even include the distance from the trailhead. Early into my trek, the lingering fog dissipated, revealing a picturesque scene. In the snapshots of Lighthouse Rock, you’ll notice clear blue skies adorned with a few wispy clouds high above. As you traverse the canyon floor, be prepared to marvel at the stunning canyon walls, vibrant cacti, and diverse fauna, as well as encounter some animal droppings.
Amidst the beauty, the echoing calls of what seemed like geese high in the sky caught my attention. It fascinated me how the canyon walls magnified their sounds, making the birds surprisingly loud. Continuing my hike, I encountered several dry river beds and I could only imagine how full and dangerous these are when it rains. I did see some signs of the recent rains, but nothing that you couldn’t navigate.
Pictures: Some of the different trail markers and trail guides
Pictures: Cacti | Animal droppings
Picture: Canyon Walls along the beginning of the trail. Also, that’s not Lighthouse Rock – I thought it was at first.Picture: The Beauty of the Canyon Walls
Pictures: Bench and Tree | Another Heat Warning along the Trail – this is a serious situation here!
Picture: More of the Canyon
Pictures: Dry River Bed | The little water I saw on the trail
A New Career: Lighthouse Rock Docent
As you get closer to Lighthouse Rock and as you begin to ascend up the trail, the trail gets much narrower. It wasn’t crowded on the day of my visit, but I can only imagine how challenging this portion of the trail is when there are a lot of people on it. There are a couple of places to rest on your way up to Lighthouse Rock where you get a view of the canyon floor below you.
When you reach Lighthouse Rock, you’ll be directly in front of the rock and as it was around 11 AM when I got there, it was a backlit and not ideal for pictures. So, went around to the left of the rock and then came back and went around to the right of the rock. I’d recommend doing this as it gives you a much better perspective of the rock formation. As you walk around each side of the rock, be prepared as there are no marked trails.
I decided to have a little snack after getting some great pictures of lighthouse rock and before heading back to the parking lot. As more and more people came to the rock, I began to act as a docent, giving them tips on where to go and get pictures of this impressive rock formation. I think I found a new career calling!
Picture: View of the canyon floor belowPicture: Initial view of Lighthouse Rock, with the sun behind the top, causing the photo to be backlitPicture: View of Lighthouse Rock from the left sidePicture: View of Lighthouse Rock from the right sidePicture: Lighthouse Rock
Refueled and recharged after a quick snack, I zipped back to the parking lot with a brisk pace, eager to uncover more adventures. I passed several hikers on the way to Lighthouse Rock, including one couple that had just started their trek, and were already breathing heavily and panting. Needless to say, it became evident why so many cautionary signs. All I kept thinking was of my time on Mt. Kilimanjaro and the guides saying “pole, pole,” in Swahili or “slowly, slowly” – remember this is not a race. Lighthouse Trail was a great way to kick off my visit to Palo Duro Canyon State Park!
Pictures: The Canyon as I hiked back to the Lighthouse Trailhead and Parking Lot
Picture: Palo Duro Canyon from the canyon floor
Rock Garden
As you exit the Lighthouse Trail parking lot, Park Road splits and becomes a large loop. You can go in either direction and I decided to go left and head to Rock Garden Trail. This 2.4-mile one-way trail takes you through an ancient landslide up to the canyon rim, with an elevation change of 600 feet and it is rated difficult. There are several areas to pull off and park here, but no formal parking lot. This trailhead had a thermometer as well and the day was getting warmer – it was now 81 degrees. Time to hydrate!
I decided not to hike this entire trail as I knew I had a major hike and climb in 2 days and I wanted to save my legs and strength for that hike. As I looked up the side of the canyon, there seemed to be some cool and interesting rocks and boulders, so I decided to climb up a portion of the trail. I ended up hiking about 1/2 mile, which gave me some incredible views of the valley below as well as seeing some cool rocks and boulders.
After Rock Garden Trail, the road begins to loop back around towards the entrance. There are several places to park and at one I came across an interesting historical sign about the Battle of Palo Duro Canyon, one of the most significant battles of the 1874-75 Indian Campaign.
Pictures: Rock Garden Trailhead | Trail Thermometer – the temperature is now 81 degrees!
Pictures: Rock Garden Trail
Picture: The canyon below from Rock Garden Trail
Pictures: From Rock Garden Trail | Rock Garden Selfie
Picture: Historical Marker for the Battle of Palo Duro Canyon
The Big Cave
After coming around the bend and heading back towards the entrance, you’ll come to the Big Cave. Although this is on the park map and one of the Points of Interest, it is not well marked, nor is the trail to the cave. There is a picnic table by the side of the road, which is the best indicator that you are in the right place, and you park along the side of the road. It’s a relatively short hike up to the cave and due to the red clay soil, it can be a bit of a challenge – slippery – as you hike up into the cave. At first, I went up the left side of the cave but realized this was not really a viable path to the cave entrance. I end up hiking straight up into the cave. There is a little bit of a boulder scramble, and it looks much worse than it really is. Once in the cave, I was so happy I persevered and would recommend this as a stop.
Picture: Looking up to the Big Cave
Pictures: Going up the left side of the cave | Looking down from the left side of the cave
Pictures: Looking into the Big Cave | Initial view out of the Big Cave
Picture: Inside of the Big CavePicture: Looking out from the Big CavePicture: The side of the Big Cave entrance
After the Big Cave, I continued along Park Road on the floor of the canyon stopping at the Lone Star Interpretive Theater, the Old West Stables, and the Trading Post for more views of the canyon before I headed back up to the Visitor Center and for the last hike of my day.
Pictures: View of Palo Duro Canyon | One of the many informational signs
Picture: Final view of the canyon from the canyon floor before I headed back to the Visitor Center
CCC Trail
Embarking from the Visitor Center, the CCC Trail stretches 1.4 miles one-way, with a descent of 500 feet, earning its difficult rating. The journey takes you across four historical CCC bridges and through four distinct geologic layers, from the canyon rim to the floor below. Despite its challenging label, I didn’t find the trail overly strenuous. Having already explored the canyon floor, I decided to forego the final descent but covered a mile of the 1.4-mile trail. With a massive hike looming in two days, I wanted to conserve energy and focus on preserving my legs.
Completing the 2-mile out-and-back hike in a brisk hour, I highly recommend this trail if time allows. It treats you to some of the most breathtaking views of the canyon, offering unique perspectives of Park Road winding its way down to the canyon floor. Don’t forget to explore the various viewpoints along the trail; they might not be directly on the path, but they offer unparalleled glimpses of the canyon’s beauty.
Pictures: The view at the top of the CCC Trail
Picture: Looking back at the beginning of the CCC Trail and one of the geological layers
Pictures: The first of four CCC Bridges that you’ll cross
Picture: View Point just off the trail
Pictures: View of the Canyon as you hike down
Picture: Another CCC BridgePicture: Amazing view of Palo Duro Canyon
Pictures: Park Road winding down to the Canyon floor
Pictures: Trail Marker | Cool tree on the edge of the canyon
Picture: Where I turned around on the CCC Trail, just before the final descent to the canyon floor
So, gear up for an unforgettable adventure at Palo Duro Canyon State Park! Dive into a multi-day expedition, setting up camp right in the heart of this natural wonderland. Imagine waking up to the breathtaking beauty each morning, ready to conquer a different trail each day. Trust me, it’s not just a trip; it’s a journey that promises to etch a lifetime of vivid memories into your soul. Don’t miss out—seize the opportunity for an immersive experience that will linger in your heart forever!